Over The Air Upgrade – Sierra Wireless HL7650 Modem
Updating the Firmware of the Miro’s Wireless 3G/4G HL7650 Modem Remotely, via the Sierra Wireless AirVantage Platform
This guide illustrates how to update the firmware of the Miro instrument’s Sierra Wireless HL7650 modem remotely via the AirVantage platform, for the Miro instrument to be able to operate over Telstra’s upgraded 4G LTE network. The AirVantage platform is provided by Sierra Wireless, the manufacturer of the modem.
Overview
Requirements
The following are required to carry out and complete the upgrade:
- Citrus_v1.3.0.10.exe
- miro_v3.16_May04.fw
- An operating Miro instrument that can be communicated with and installed with a Sierra Wireless 3G/4G HL7650 modem for 3G/4G remote cellular communications
- SIM card installed in the Miro instrument that can connect to the ‘telstra.internet’ APN. Contact service provider if unsure or if it is not available on the SIM card
- Internet access and a PC or laptop
- Basic working knowledge on installing, accessing, and using the Citrus software.
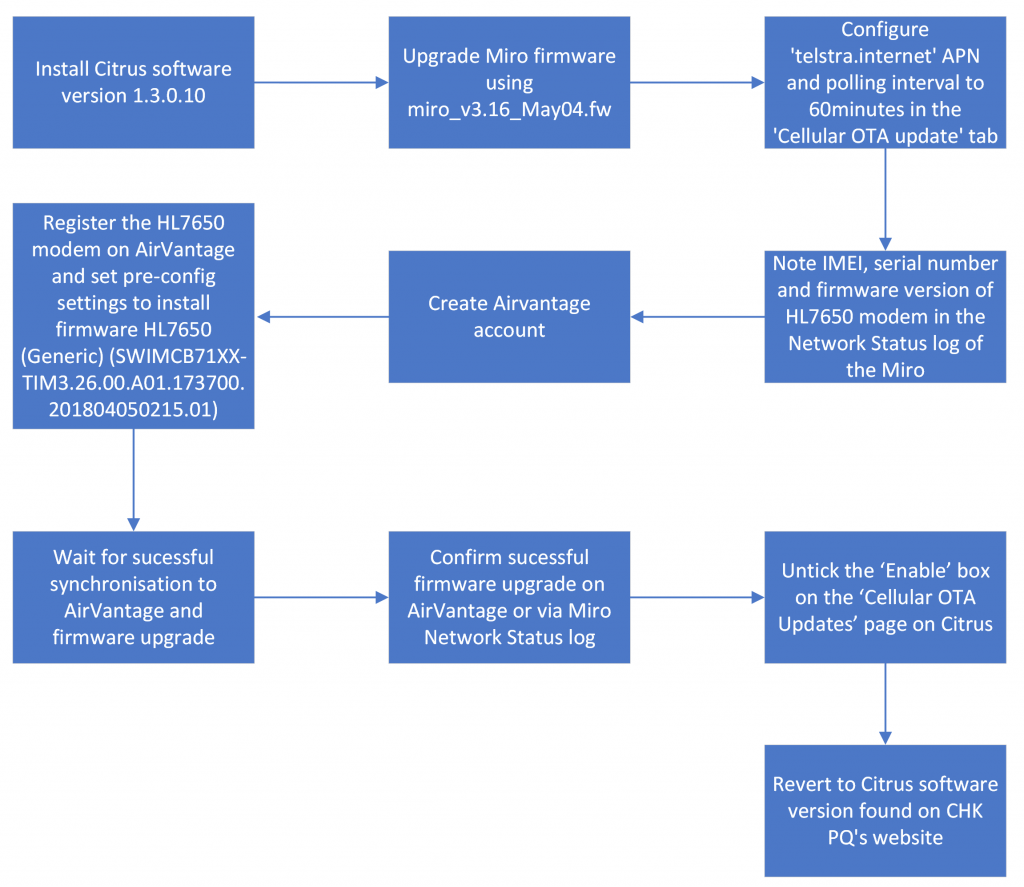
Setting up the Miro instrument for upgrade
Step 1: Install Citrus version 1.3.0.10 using the Citrus_v1.3.0.10.exe file provided.
Step 2: open the Miro instrument’s operation page using Citrus version 1.3.0.10. The Miro’s operations window will appear as shown in Figure 1.
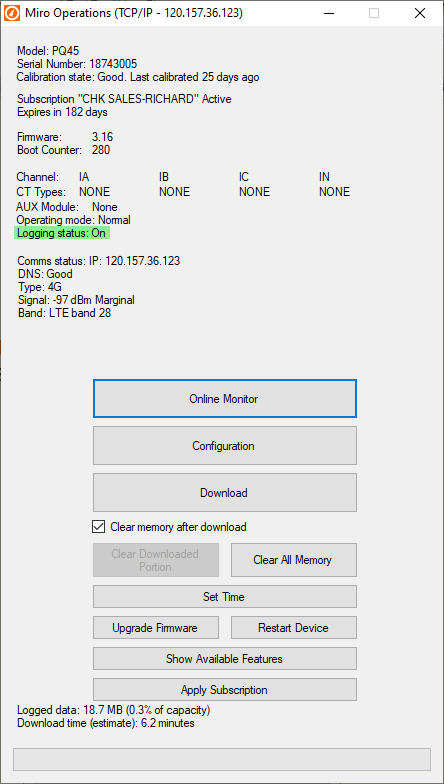
Step 3: Click on ‘Upgrade Firmware’ and navigate to the folder containing the miro_v3.16_May04.fw firmware. Select the firmware file and click ‘Open’. This will start the firmware upgrade. Firmware upgrade progress will be indicated by the green progress bar at the bottom of the operations window.
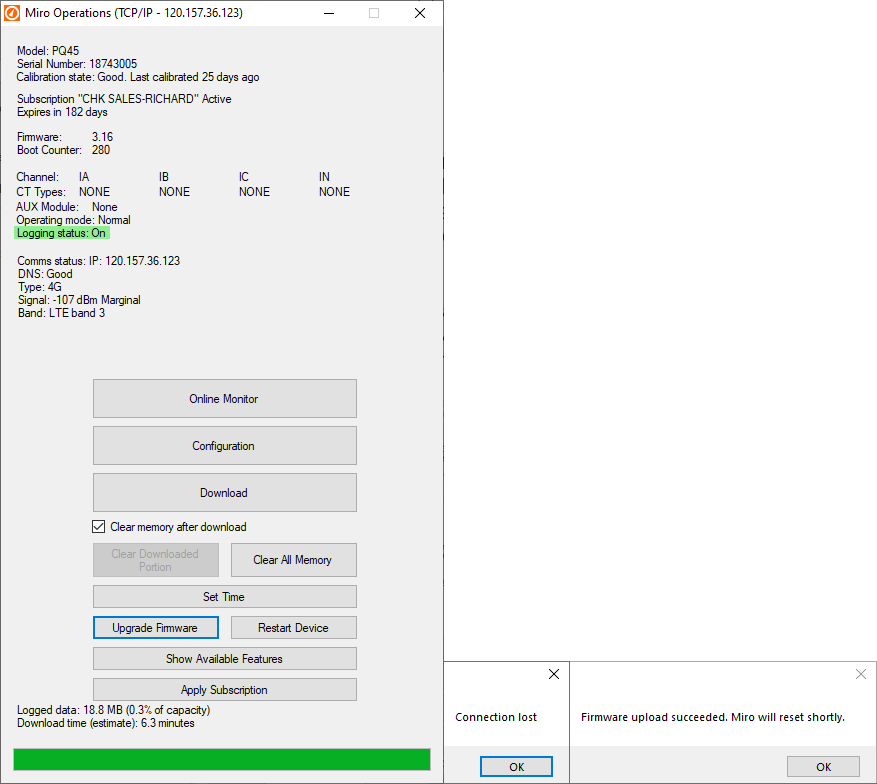
Please note that during any restart process in this instruction, it may take several minutes to restart the Miro instrument along with its communications. Multiple connection attempts may also be needed, especially with the SSH secure connection which can take longer to connect.
Once the upgrade is complete the Miro instrument will reset, causing loss of connection as shown below in Figure 2. Open the Miro operations window and note the firmware listed should be ’3.16’.
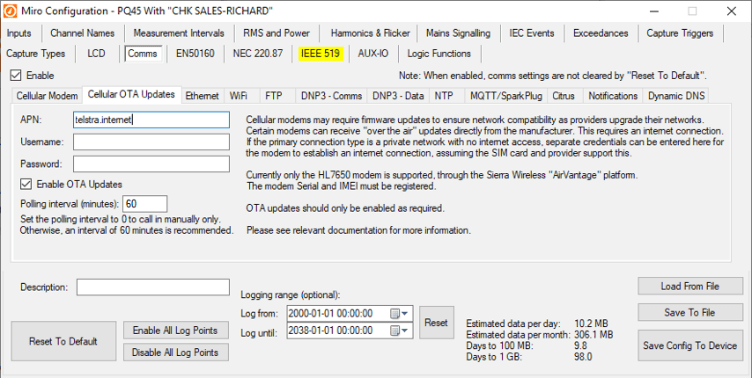
Step 4: On the operations window, click on ‘Configuration’ to open the Miro configuration page. Navigate to the ‘Cellular OTA Updates’ tab. Tick ‘Enable OTA updates’ and enter ‘telstra.internet’ in the ‘APN:’ box as shown in Figure 3. Please note that “telstra.internet” is used only by the modem to retrieve firmware from the AirVantage website; the Miro instrument itself is not exposed to the internet. Care should be taken that changes are made only in the ‘Cellular OTA Updates’ tab, to prevent loss of remote cellular communication with the Miro instrument. Following the example shown in Figure 3, set ‘Polling interval (minutes):’ to 60 minutes (recommended polling interval). Once done, click ‘Save Config To Device’ and click ‘OK’ in the ‘Configuration set’ pop up.
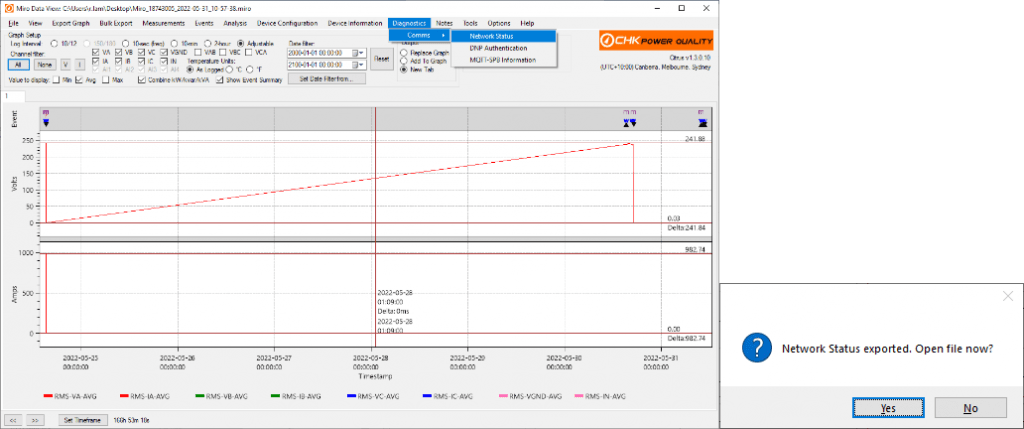
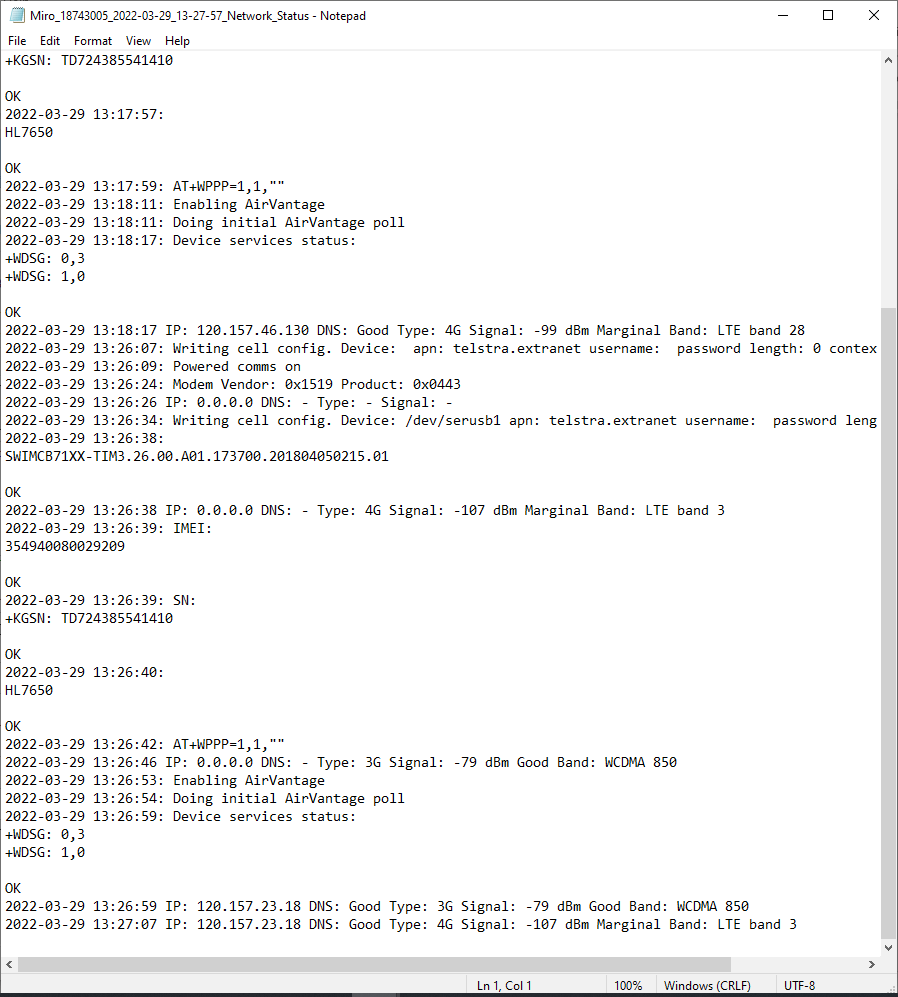
Step 5: In the Miro operations window, restart the Miro instrument to apply the configuration changes made in the ‘Cellular OTA Updates’ tab. After restart is complete, navigate to the Miro operations window. Download a Miro datafile of the Miro instrument and open the datafile. Click on the ‘Diagnostics’ tab and from the drop-down menu click ‘Comms’ then ‘Network Status’. Choose where to save the Network Status file and then click ‘Yes’ on the ‘Network Status exported. Open file now?’ popup to open the Network Status file as shown in Figure 4.
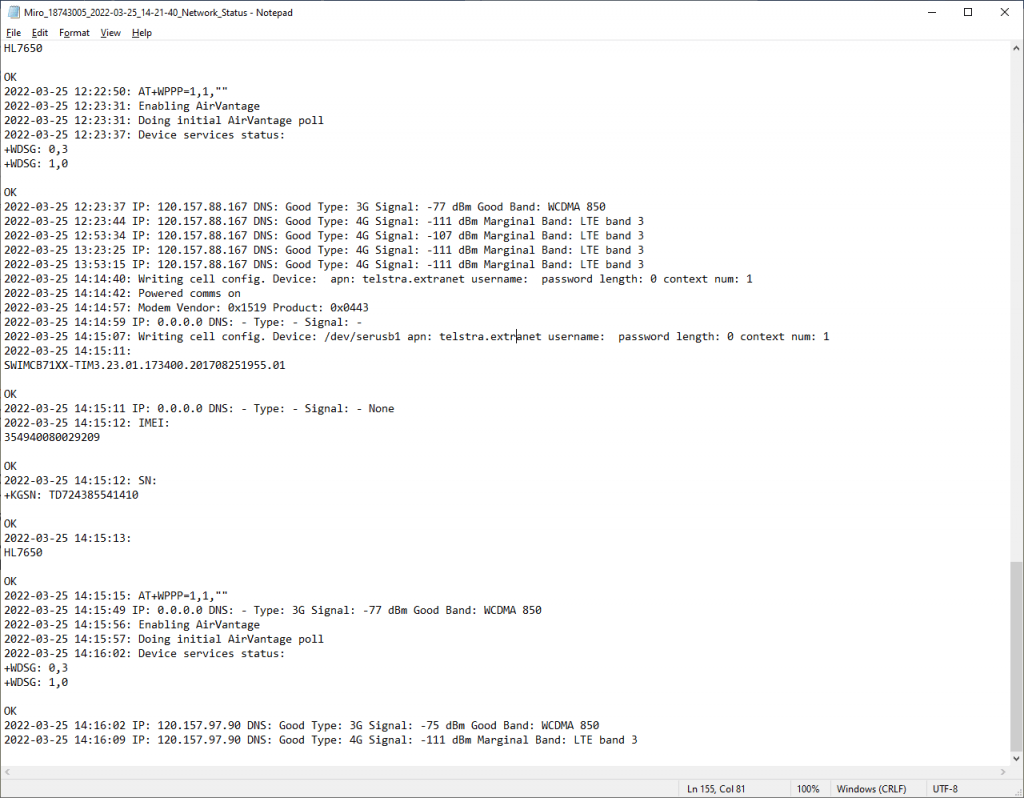
From the Network Status log, scroll down to the bottom where the latest network status is and note both the IMEI and serial number of the HL7650 modem. As shown below in the Figure 5 example, the IMEI number is listed after the word ‘IMEI:’ i.e., ‘354940080029209’ (underlined in red). The serial number is the number listed after the word ‘+KGSN:’ i.e., ‘TD724385541410’ (underlined in blue). The current firmware version of the modem is also listed i.e., ‘SWIMCB71XX-TIM3.23.01.173400.201708251955.01’ (underlined in green). Note down these values as they will be required later when registering the modem on the AirVantage platform. Repeat Steps 2 to 5 for each Miro Instrument.
Website: www.chkpowerquality.com.au
Creating an AirVantage account
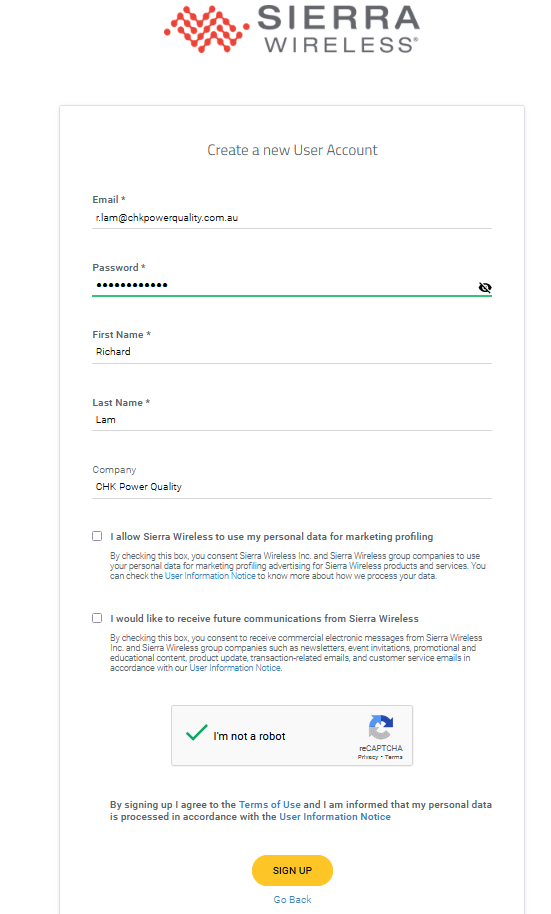
Step 6: Using your internet browser, open the link https://eu.airvantage.net/accounts/signup?type=UFOTA. At the bottom of the page click on ‘SIGN UP’. A new page will then open, enter your details as required to create a user account as seen in Figure 6. Once done, click on ‘SIGN UP’. An activation email will be sent to your email address upon successful sign up as seen in Figure 7. Click ‘SIGN UP ACCOUNT’ to activate account.

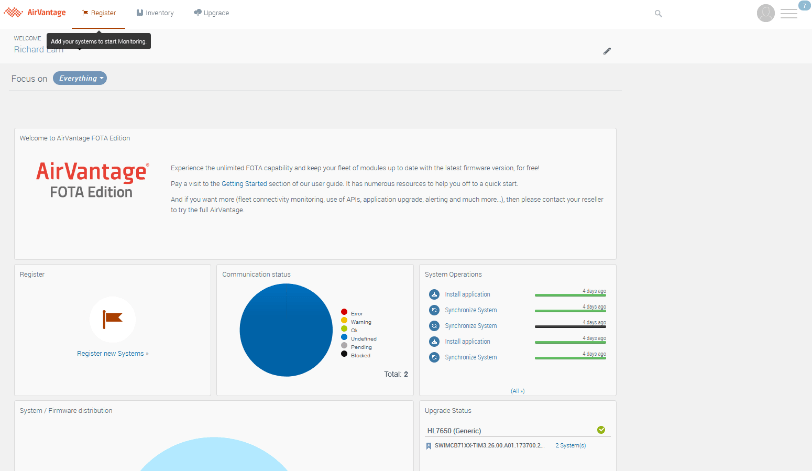
Step 7: Log into the newly created account using the following link: https://eu.airvantage.net/start. Upon successful login, the following account page is shown as seen in Figure 8. From the example in Figure 8, we can see that there is a total of two modem units registered on AirVantage with this account. Click on ‘Register new Systems’ (boxed in green in Figure 8).
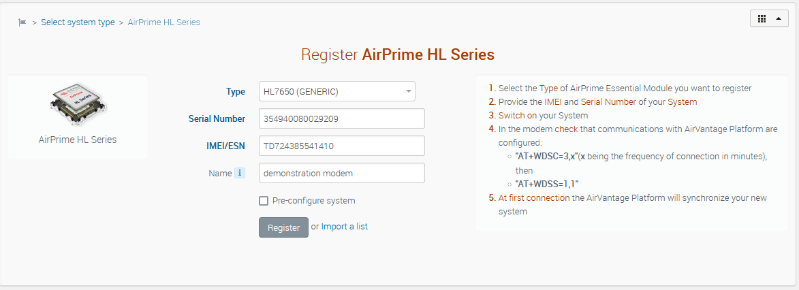
Step 8: On the registration page under the ‘Register AirPrime HL Series’ box, register the HL7650 modem in AirVantage by choosing the ‘Type’ as ‘HL7650 (GENERIC)’ and inputting the ‘Serial Number’ and ‘IMEI’ that was noted in Step 5 into the corresponding fields. For the ‘Name’, this will be the name of the modem and is up to the user on what name is given. In this example, the modem was given the name ‘demonstration modem’ as seen in Figure 9. Select ‘Pre-configure system’ and then click ‘Register’
Note that multiple HL7650 modems can registered at once by clicking on ‘import a list’ and uploading a CSV file in the required format. For more details see: https://doc.airvantage.net/fota/reference/register/howtos/registerListOfSystems/.
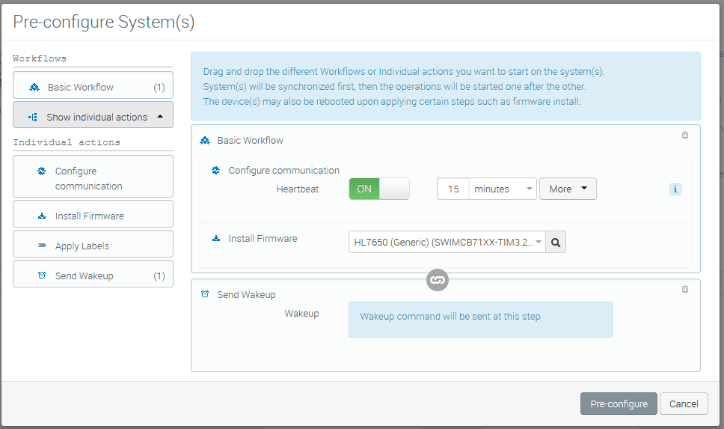
Step 9: A ‘Pre-configure System(s)’ popup will appear as seen in Figure 10. Click on the bins on the right-hand side of the ‘Basic Workflow’ and ‘Send Wakeup’ boxes (boxed in red in Figure 10) to remove the boxes from the workflow.
Under ‘Individual actions’ on the left-hand side of the ‘Pre-configure System(s)’ popup, drag (press and hold left mouse button) the ‘Install Firmware’ (boxed in green in Figure 10) to the right side of the popup and release. This will now bring up an ‘Install Firmware’ box as seen in Figure 11.
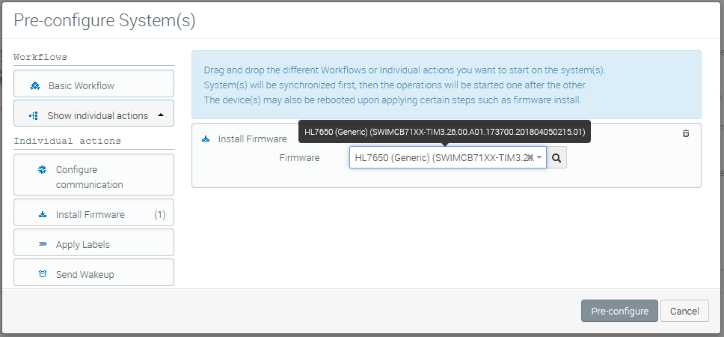
In the ‘Install Firmware’ box, from the dropdown menu, select firmware version ‘HL7650 (Generic) (SWIMCB71XX-TIM3.26.00.A01.173700.201804050215.01)’. Note the ‘A01’ which indicates the latest version of the firmware as of March 2022. Once done, click on ‘Pre-configure’. This will close the popup.
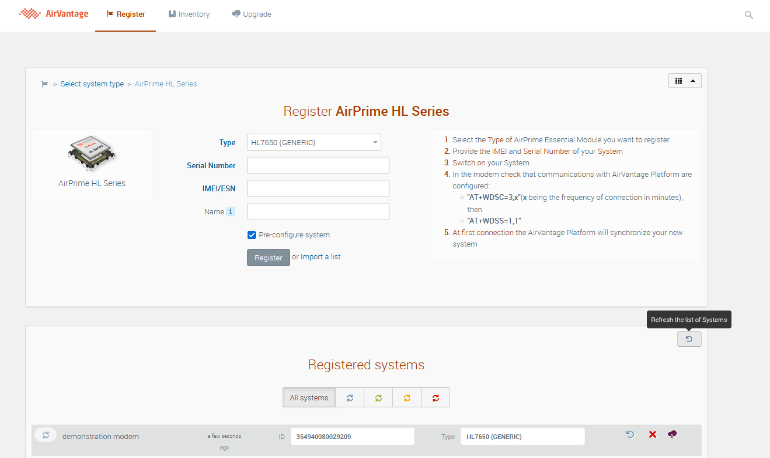
Step 10: Upon successful registration of the modem, the modem will appear in the ‘Registered Systems’ box underneath the ‘Register AirPrime HL Series’ box as seen below in Figure 12. If it doesn’t appear, the ‘Registered Systems’ box can be manually refreshed by pressing the refresh button seen in Figure 12 (boxed in red) and the modem should appear in the list. Note that the refresh icon is normally not visible until the mouse cursor is hovering over the area as indicated in Figure 12.
Click on the purple cloud icon (boxed in green in Figure 12) which says ‘See the System details in the Upgrade activity’ when the cursor is put over it. This will take you to the upgrade page for that modem.
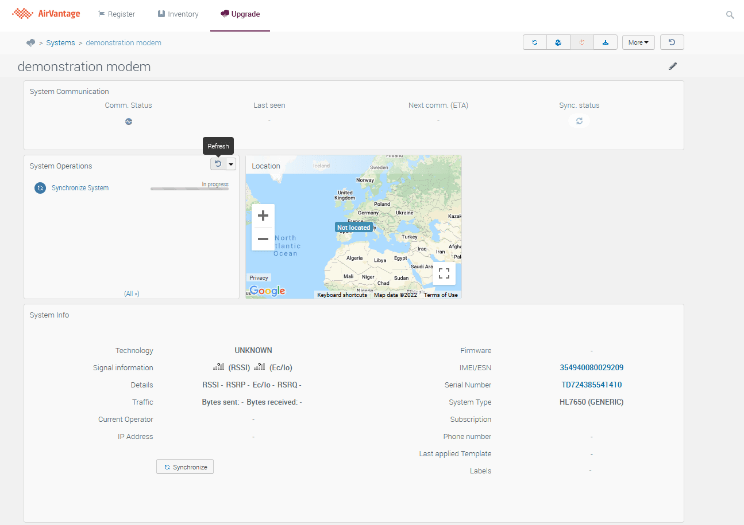
Step 11: With the modem set for pre configuration, AirVantage will automatically attempt to synchronise to the modem after registration as seen in the ‘Systems Operations’ box in Figure 13.
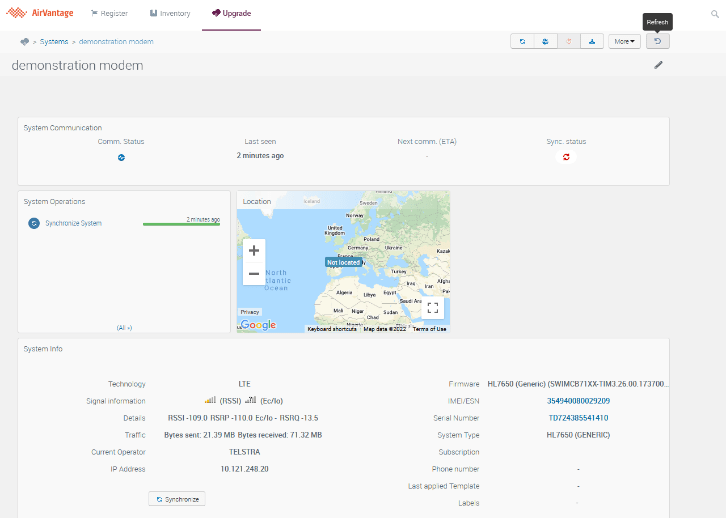
For successful synchronising with the modem and later the firmware upgrade, the modem needs to poll the AirVantage platform. With the polling interval set to 60 minutes, wait for the modem to poll AirVantage and wait for successful synchronisation as seen in Figure 14. The refresh icon may need to be clicked (boxed in red in Figure 14) to see the successful synchronisation.
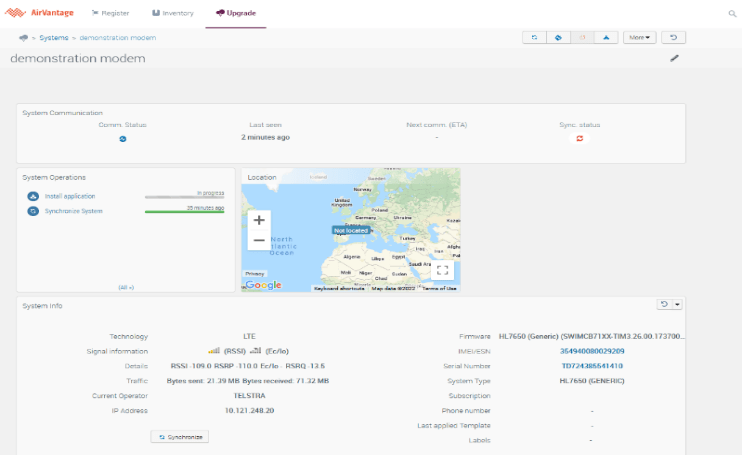
Step 12: After AirVantage has successfully synchronised with the modem, the modem will automatically attempt to install the firmware for the modem and the ‘Install application’ task will appear in the ‘System Operations’ box as seen in the ‘Upgrade’ page of the modem in Figure 15 (refresh icon may need to be
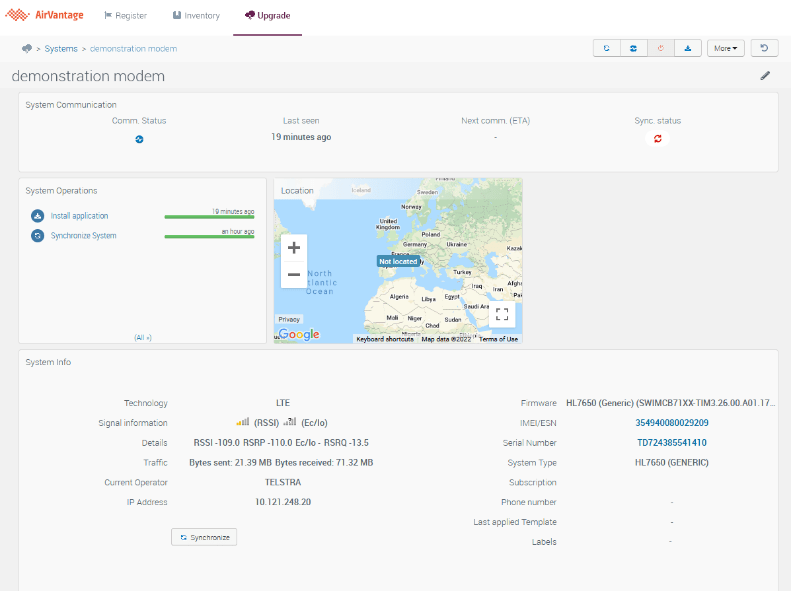
Step 13: During modem firmware upgrade, 3G/4G connection will be reset and so connection of the Miro instrument to Citrus will be lost. Once the upgrade has been completed, the ‘Install application’ progress bar in the ‘Upgrade’ page will be completely green and the ‘Firmware’ version will be displayed in ‘System Info’ as shown in Figure 16 (boxed in red). The refresh icon on the ‘Upgrade’ page (boxed in green in Figure 16) may be required to be clicked more than once during and after upgrade to see the updated statuses on the ‘Upgrade’ page.
Alternatively, to check that the modem has the latest version of the firmware installed, check the network status log of the Miro instrument and note the firmware number now listed as ‘SWIMCB71XX-TIM3.26.00.A01.173700.201804050215.01’ (underlined in red in Figure 17).
Step 14: With the modem firmware update done, the OTA updates for the Miro instrument needs to be turned off. To do this, untick the ‘Enable’ box on the ‘Cellular OTA Updates’ page on Citrus (see Figure 9). Repeat Steps 8 to 14 for each Miro Instrument as necessary.
Step 15: Once upgrade of all HL7650 modem firmware is successful, the Citrus software needs to be reverted back to the latest released version. This can be found on CHKPQ’s website via the link: https://www.chkpowerquality.com.au/downloads/
and as seen in Figure 18. The link to download the Citrus software on this page is underlined in red.
Install the Citrus software version available for download from the CHKPQ website to the same folder where Citrus version 1.3.0.10 is located. This will overwrite Citrus version 1.3.0.10. The upgrade process is now complete.

Technical note – OTA Upgrade for the HL7650 Modem F/W, Using the AirVantage platform, 29 June 2022, rev 1.00
Telephone: +61 2 8283 6945; Fax: +61 2 8212 8105
Website: www.chkpowerquality.com.au